Speed Up Your Guitar Playing
Being able to play fast on guitar is easy, but playing fast and accurately takes more work. You want to be able to play fast properly. Try these steps, when you practice, to help you reach that goal.

1. Picking Control
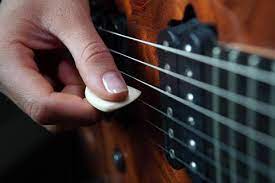
Good speed starts with your picking hand. If you can develop good control over your picking technique, you’ll find it easier to play anything faster.
If you try to play fast without good picking control, you’ll end up tripping up over the string or you’ll have trouble synchronizing your hands.
2. Hand Synchronization
Once you build up a solid picking technique with high accuracy, the next step is to focus on hand synchronization.
Poor hand synchronization leads to dead or muted notes or other timing issues.
Before you try to build up the speed on any part you’re practicing, spend some time working on synchronizing both hands.

3. Building Speed
If you have built up solid picking control and you’re able to properly synchronize both hands, you’re ready to start building up speed.
It is crucial that you only build speed after you have already worked on your picking control and hand synchronization.
If you have a sloppy picking technique and you try to play fast, all you end up with will be fast and sloppy playing. Take your time to work on the first two steps before you try to build your speed up to a high tempo.
Exercise 1: Picking Hand Control
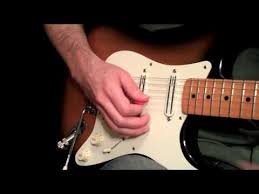
This first exercise is to help you focus completely on your picking control without having to worry about coordinating both hands
The goal here is to make sure that your picking hand is able to consistently pick the string at a steady tempo without getting tripped up or missing a note.

As you can see, you don’t even need to fret a single note to play this exercise. This means you can focus 100% on how your pick hits the string without thinking about your fretting hand
Here are the steps to practicing this exercise properly:
- Set up a metronome at a slow tempo (as slow as you like – maybe try 60 bpm as a starting point)
- If you’re playing electric guitar, turn off all effects and use a basic clean tone
- Play four notes per click of the metronome and focus on timing the notes perfectly
- Use alternate picking (explained below) and aim for a consistent picking motion
- Once you can play this exercise a few times in a row without a single mistake, slightly increase the tempo (eg: 60 to 65 bpm)
Aim for accuracy with this exercise. If you rush and try to build the tempo up too soon, you’ll end up with a sloppy technique that will cause problems later on.
Keep the main three steps mentioned earlier in mind. Build up control first, then hand coordination (not needed in this exercise), then build speed.
You will see two symbols repeated throughout these exercises. The square and pointed symbols in the above exercise tell you which direction to pick the strings.

Pay close attention to the picking direction in all of these exercises because the way you pick the strings will have a big impact on how fast you can play.
Do not move on to the next exercise until you can consistently pick the string without any mistakes at a high tempo.
After all, if you can’t play this basic one-handed exercise perfectly, how do you expect to be able to play fast parts that use both hands?
Exercise 2. Adjacent Strings
This exercise continues to build the picking control you worked on in Exercise 1. This time the focus will be on moving back and forth between different strings.
Being able to play fast while moving between strings is harder than it seems.

The goal with the above exercise is for you to be able to effortlessly move between the strings without any missed notes, gaps in the rhythm, or mistakes.
The rhythm you hear in this exercise should sound exactly the same as Exercise 1. The only difference is that you should hear a change in pitch as you move between the strings. But the constant picking should sound exactly the same.

Start with a low tempo with the metronome and build it up gradually.
Once you’re able to effortlessly move back and forth between the strings without any problems, you can move on to the next exercise.
Exercise 3. String Skipping
Exercise 2 helped you practice moving your picking hand to another string. This exercise builds on this skill and asks you to skip a string.
A lot of guitarists find string skipping challenging, so take your time working on it before you try to build up the speed.

Try to anchor your picking hand on your guitar by resting your pinky on the guitar’s body. This can help improve your picking accuracy.
After you feel comfortable with this exercise, try creating similar exercises that jump back and forth between different strings on your guitar.
Practice skipping one, two, and three strings until they all feel comfortable.
Exercise 4. Hand Coordination
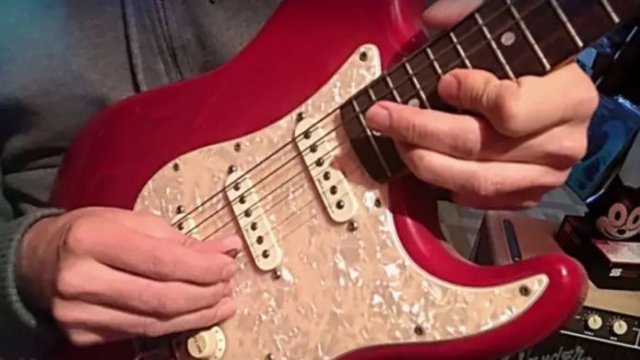
The first three exercises focus completely on your picking hand. When you can play all three exercises comfortably at a high tempo, it’s time to start working on your hand coordination and synchronization.
You have probably seen this classic 1-2-3-4 everywhere, but there’s a good reason why it’s used by so many guitarists: it works.
This exercise helps you work on synchronizing both hands as well as using all four fingers when fretting notes. It’s a fantastic exercise for developing speed.
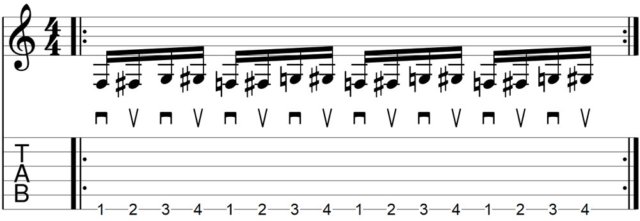
When you play the above notes, use your first finger to play the first fret, your second finger to play the second fret, your third finger to play the third fret, and your fourth finger to play the fourth fret.
In other words, line up one finger per fret.
Your picking hand will be doing the exact same thing as it has done in the earlier exercises, so you should feel comfortable with the alternate picking.
In this exercise, you shift your focus to your fretting hand and the timing of each note.

Start off slow to make sure that you press down on each note just before you pick the string. This might feel easy when you play slow, but it becomes significantly harder to do once you start increasing the tempo.
Exercise 5. Hand Coordination 2
This exercise builds on what you practiced in Exercise 4 and helps you feel more comfortable across the strings.
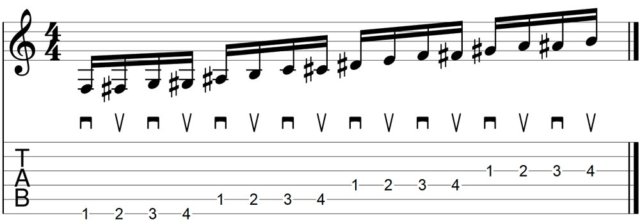
Continue the above pattern all the way to the first string, then reverse your direction and go all the way back to the sixth string.
You should only work on this exercise if you can play Exercise 4 at a high tempo without any mistakes. Once you can do that, you can shift your focus on to moving between the strings. If you can’t play Exercise 4 perfectly at a high tempo, you’ll struggle to play this exercise properly.
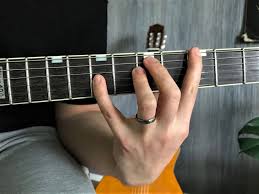
Start off slow to make sure that you press down on each note just before you pick the string. This might feel easy when you play slow, but it becomes significantly harder to do once you start increasing the tempo.
The next 5 exercises will focus on different techniques, but the previous 5 exercises should be your foundation, in the beginning, of your speed training.
Exercise 6. Three Notes Per String
You may notice that a lot of fast solos often play scale runs and patterns using three notes per string.
This exercise will get you used to picking three notes per string so you feel comfortable with it when it shows up in songs.
The below exercise takes the simple pattern you practiced in the previous two exercises and modifies it to only play three notes per string. This will make it easier for you to focus on the change in pattern.
Just like the previous exercise, continue this pattern all the way to the first string, then all the way back to the sixth string.

There are many different ways you can pick this exercise and different guitarists will prefer different picking methods.
The above example uses strict alternate picking. In Exercise 5, you will notice that when you change to a different string, the first note uses a down-pick. That meant every string followed the same picking pattern.
With this exercise, the picking pattern changes with each string. The first three notes are picked down-up-down, then the next three notes on the next string are picked up-down-up.
This may feel awkward at first, but it’s a crucial skill to practice.

With enough practice, you will feel completely fine switching picking direction as needed. Keep practicing this exercise until you feel just as comfortable playing the up-down-up strings as you do with the down-up-down strings.
When you practice this exercise with a metronome, you want to play three notes per click. That means each string starts on a metronome click. If you want to practice this without a metronome while you build up your confidence, count out loud (or in your head) “one and a, two and a, three and a, four and a”. That’s how you count triplets as used in this exercise.
Spend a lot of time working on perfecting this exercise. The work you put in will pay off when you start seeing this technique used in songs and solos.
Exercise 7. Adding Legato
This exercise combines hammer-ons, pull-offs, and picking to show you how combining different techniques can change the way something sounds on guitar.
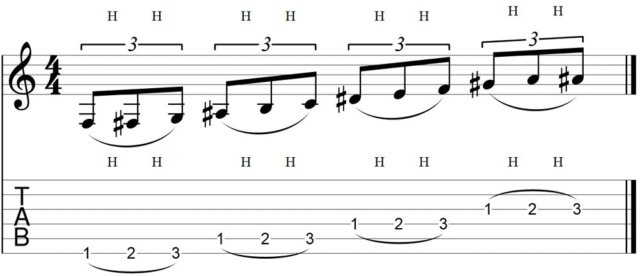
Some guitarists find it easier to play fast with alternate picking while others find legato easier to play fast.
The most important thing to keep in mind is that you continue to focus on your timing and accuracy. Sloppy legato played fast sounds just as bad as slopping picking.
For this exercise, pick the first note on the string, then smoothly hammer-on to the second note, then add another hammer-on to the third note. Keep the “one and a” triplet rhythm in your head.
The challenge with this style of playing if you haven’t tried it before is evenly spacing each note.

Once this exercise feels easy, try coming up with variations such as reversing the pattern (3-2-1) using pull-offs, or adding legato to Exercise 5.
Exercise 8. Mixed Legato
This exercise combines hammer-ons, pull-offs, and picking to show you how combining different techniques can change the way something sounds on guitar.
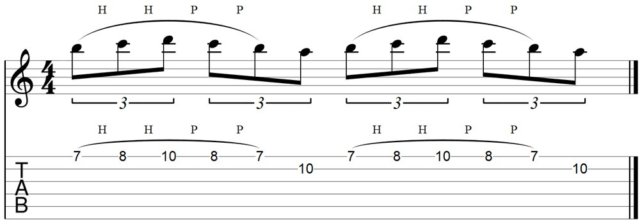
Play around with the picking direction to figure out what feels comfortable for you.
The important thing with this exercise is that you keep consistent timing. Each note is the same length, so you shouldn’t hear some notes being played faster than others.
The interesting thing about legato is that it’s easier to play it fast compared to playing it slow. When you play legato fast, you don’t need to press down as hard on the string to keep the string vibrating.

So don’t give up if you can’t get this exercise to sound good at a slow tempo. As you gradually build up your speed, you will notice that the string seems to ring out easier and you can hear the five legato notes clearer.
As another exercise, try playing the above exercise using strict alternate picking instead of legato. See if you can build it up to the same tempo as you can play using legato.
By comparing the above exercise using legato vs alternate picking, you’ll get a good idea of which style of playing suits you. Some guitarists prefer the sound and feel of picking every note while other guitarists prefer the sound and feel of legato.
Play around with this exercise to figure out what you prefer.
Exercise 9. Two Hand Legato
Two-hand tapping is a great way to work on your hand synchronization. Being able to keep both hands in perfect sync is crucial to play licks like this.
The ‘T’ above the notes in this exercise represents tapping using your picking hand. The other notes are played legato.
This means you don’t pick a single note in this exercise.
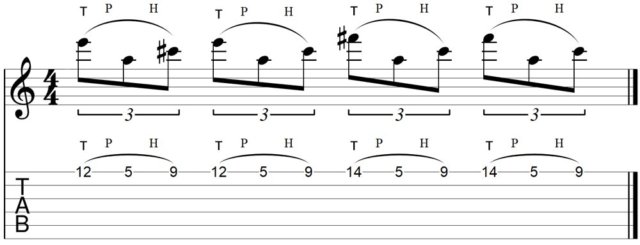
It’s up to you which finger you use to tap the higher notes. Play around with all four fingers to see what you prefer.
Remember that legato is harder to play at a slow tempo, so don’t worry too much if the notes don’t ring out perfectly in the beginning. As you improve your technique, you’ll be able to play exercises and licks like this at any tempo.
Be careful not to let the other strings ring out while tapping the notes. Use the rest of your picking hand to lightly mute the other strings and keep everything quiet.
You can give the string a little flick with your tapping finger as you pull off to the fifth fret. This will help keep the string vibrating and keep the notes crystal clear.

As you build up the tempo, you won’t need to flick the string at all and the force of your tapping will keep the string vibrating.
Exercise 10. Arpeggios
A lot of guitarists enjoy playing arpeggios during fast solos or lead breaks. There’s something about how an arpeggio feels and sounds when you can play it blisteringly fast that guitarists are drawn to.
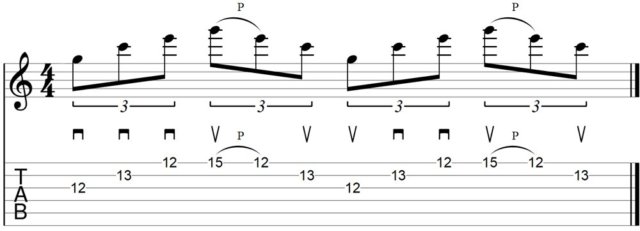
The above exercise is a simple example of sweep picking, but sweep picking is not the only way you can play this arpeggio.
Sweep picking is when you smoothly move the pick across the strings in one sweeping movement instead of using individual pick strokes. You can see that the first three notes in this exercise use a down-pick. To play this, you would smoothly rake your pick across the three strings in one smooth movement.
The challenge with sweep picking is timing your fretting hand to press down on each string just in time for when the pick reaches each string. You only want to hear one note at a time, so you also need to lift each finger off of the fret just after you play it.
Try playing this arpeggio exercise using strict alternate picking and compare it to sweep picking. You can play either picking technique at a high tempo, but you may find that one feels easier than the other.

Once you can play this exercise at a high tempo, try arpeggios that cover four or more strings or combine the arpeggios with two-hand tapping.
Getting Past Speed Plateaus
When you work on building up your speed on guitar, eventually you will hit a plateau. You’ll reach a certain tempo and just can’t seem to play any faster.
You will hit many plateaus as you learn to play faster on guitar. You can get past them as long as you don’t give up.
Guitar & Gear Articles


