audio interfaces
Recording technology has come a long way in the past couple of decades. There are major label releases where artists recorded songs on a tour bus or in a hotel closet with the same gear you can have in your home studio for an affordable price. You can also have access to the most advanced gear out there for a far more reasonable cost than we paid in the 80’s.
The individual at home can produce the same quality of recordings for their podcasts, YouTube videos, and music as a major label pumps out. The only difference is that while the single person in their bedroom might only need one or two inputs, the professional studio might require 32 inputs or even more. Even radio broadcasting studios can operate with bedroom producer levels of inputs, though.
The first step to any recording in this day and age is to grab yourself an audio interface, because you need a way to digitize the audio and get it into your computer.
What is an Audio Interface?
An audio interface is the piece of studio equipment that allows you to record an analog signal, convert them to digital audio signals, and then transport them into your computer so you can do all of your post-processing work like mixing and mastering. It is used in sound recording and production for audio engineering for the entertainment and telecommunications industries.
This is one of your two sound devices that are a bare minimum for capturing audio. The other is a microphone or an electric instrument of some sort with an output jack. If you’re recording any real-world source, such as your voice, an acoustic guitar, or a saxophone you’ll need a microphone in addition to your interface.
The interface takes the signal from your microphone or instrument and digitizes it before sending it to your computer. It does this with an analog-to-digital converter using pulse-code modulation. You can think of this whole package as a standalone computer sound card that has some extra features.
Inside an Audio Interface
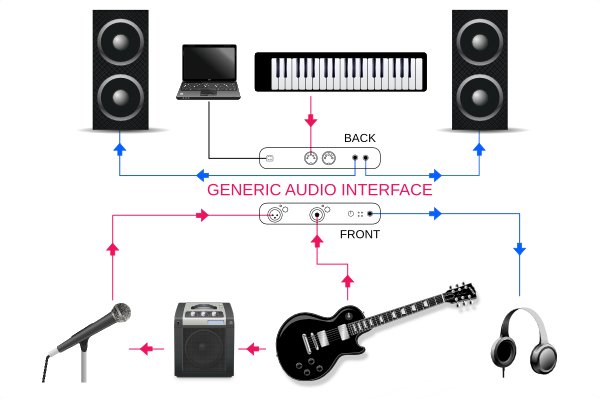
Let’s use this picture as a generic reference, showing instruments, a microphone, loudspeakers, etc., and how they all connect together.
The red lines show audio sources leading to their respective inputs. The blue lines show outputs leading to studio monitor speakers or headphones. The black line leads from the interface to the laptop and is how they communicate with each other. Each line represents a studio cable of some type.
INPUTS
The difference between the two is that microphones need to be ran through a preamplifier because their electrical signal is much smaller in amplitude when produced by a transducer than that of an electronic instrument (which still needs a DI box, interface, or some audio power amplifier to hit line level).
The XLR input for mics will run it’s signal through a preamplifier, while the Hi-Z input for instruments will bypass it. The front of your interface will feature a gain knob (sometimes called ‘trim’) which controls the amount of volume you’re adding to your microphone signal.
You’ll also find a button to engage the 48v phantom power, which is a small electrical charge that runs up the XLR cable to power your condenser microphone. Some mic’s include their own external power supply and don’t need 48 volt phantom power, but using it won’t damage your mic if it’s not needed (though you should turn it off before unplugging or plugging in your mic).
Another input type is the MIDI input. This option is usually only available in the higher end models. The MIDI is for keyboards and other digital instruments that can output MIDI data. It can replace your standard keyboard sounds with other sound fonts stored in your computer or external sound bank. You can also manipulate that data. This is how most pop, rap, and dance music is created.
The same goes for instrument inputs. If you find you need one later but your interface doesn’t feature one (it will) you can use a Direct Injection (DI input) box to take the input and output it through an XLR cable. High quality D.I. boxes are available at extremely cheap prices due to their simplicity in operation and construction.
The smallest of digital audio interfaces provide one mono input, while the next step up has two mono inputs that can be used to record in stereo, since all audio in the present is at least in stereophonic sound if not surround sound. Monophonic sound fell out of favor in the 1950’s!

OUTPUTS
The lower-end interfaces typically will only feature one headphone output with a dedicated volume control while the more expensive options may feature two or more. There are also dedicated headphone amplifiers that offers strips of outputs for all of the band members, so this isn’t really a concern as long as there’s at least one.
These are almost always quarter inch TRS outputs. There are all kinds of adapters available for a dollar or two, so again, no worries here about cable conversions.
Studio monitors refer to your speakers, not your computer screen. That’s the term used in the music industry for flat-frequency response speakers that help with critical listening and detail-oriented decision making.
Most interfaces uses XLR cables for the master output to your monitors, although some will use TRS cables. All types of cables and adapters are available to make sure it works with your monitors.
Finally there’s the interface cable, which is usually USB powered or uses Firewire. Newer options can feature Thunderbolt cables for Mac computers and expensive options may use Ethernet cables (not that common these days) or even optical cables.
The new USB and Firewire versions are both more than fast enough these days to deal with any scenario, so you can choose whichever you want based on the inputs available on your computer. Once again, there are adapters to switch between the two that still keep everything within a digital system of transmission.
The interface cable is an output but it also brings audio back in from the computer so it can pump it out of your monitors. The main component at this juncture of the hardware is the Analog-to-Digital Converter and Digital-to-Analog Converter.
It changes your audio signal from electrical to binary code and back so your computer and your monitor speakers both can understand the signal. This is often done with oversampling (at sampling rate frequencies higher than the Nyquist rate)
MIC PREAMPS & INSTRUMENT INPUTS
Solo Musicians & Personalities: If you’re a one-person show, you can record one source at a time. So even if you’re laying the tracks and building an entire song, you’re still one person with two arms having to deal with it one or two tracks at a time.
If you’re a vocalist, podcaster, or video producer, one is probably enough although two might be better if you intend on having guests. Sharing a mic sucks. In this case, one or two inputs is all you’ll need, but be careful.
Recording Engineers / Songwriting Teams: If you intend on recording a full band, you can get away with two but you’ll have to go through the process of layering tracks. First, decide if you want to record a live performance of everyone at once. You can record the drums first to a click track and then record each track after. The number of inputs can vary depending on how you decide to set up your mic. If you mic each drum individually, you will need more inputs.
It is important to make sure that the interface you choose can be used with the DAW, Digital Audio Workstation, that you’re using on your computer.
DAW compatibility is rarely an issue but it’s worth checking. Most of the time they are universal in their ability to be used across the board because your computer recognizes the inputs as “input options” for the system.
Play it safe and check the compatibility though, especially if you’re looking at an interface with four or more inputs. Watch out for operating system requirements too.
Sometimes you’ll get plugins for popular DAW’s too, like parametric equalization, amplifier emulators, advanced audio filter options, compressors with better audio compression algorithms than stock plugins, etc.


